Mailchimp Marketing

In order to use the See Tickets Mailchimp Email Marketing tool, you will need to have a Mailchimp account. Sign up for one if you do not already have one.
Here is an overview of what you will need to do to send your first email:
- Connect your Mailchimp account with your See Tickets account
- Create a template
- Create your email
- Test your email
- Send your email
Connect your Mailchimp account to See Tickets
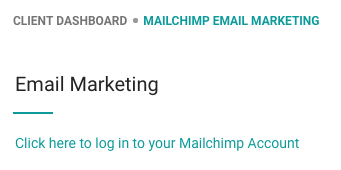
Log into your See Tickets account and head to either your Client Dashboard or an Event Dashboard.
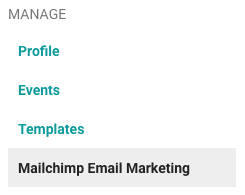
Navigate to the Mailchimp Email Marketing menu item under the Manage menu
Select the 'Click here to log into your Mailchimp account' link to connect with Mailchimp.
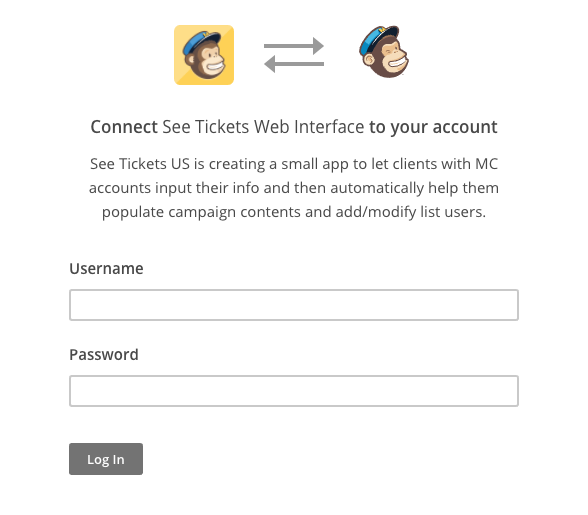
You will be taken to a Mailchimp login page. Enter your Mailchimp username and password here.
Once logged in, you will see a list of your recent emails.
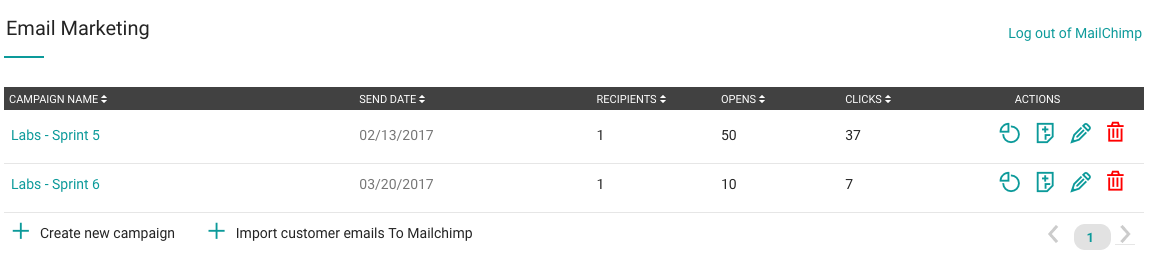
View stats, copy, edit and delete your emails using the icons on the right side of your list of emails.

Import customers who have purchased tickets to your events using the 'Import customer emails to Mailchimp' link.

This will import all customers from this client account into your Mailchimp list. This process may take a while, please do not reload the page until this action is complete.
Create a template
In order to send emails with See Tickets event information, you will need to create a template that includes specific hooks that import your event data into your Mailchimp emails.
*Note: in order to create your own template with See Tickets data hooks, you must have a working knowledge of HTML and CSS.
Get Started
To begin, create a new 'Code Your Own' template. Your template MUST be a 'Code Your Own' template in oprder to display your event data.

You also must save templates In specific folders. For client level templates, create a folder called Client. For event level, use Event as the folder name.
You can customize your template with the following data from See Tickets:
| Field | Description |
| ClientName | The display name of the See Tickets client |
| ClientWebsite | The URL of the client’s web site |
| EventImage | The URL of the image for the event |
| EventImageThumb | The URL of the thumbnail image for the event |
| EventImageThumbSmall | The URL of a smaller thumbnail image for the event |
| EventName | The event name |
| PromotedBy | The promoter name |
| PromotedByURL | The URL of the promoter’s website |
| EventURL | The URL of the web site to purchase event tickets |
| EventDate | The formatted date of the event |
| EventDescription | A description of the event |
| VenueName | The name of the venue for the event |
| VenueAddress | The street address of the venue |
| VenueCity | The city of the venue |
| VenueRegion | The region (for US, the state) of the venue |
| VenuePostalCode | The postal code of the venue |
| VenueCountry | The country of the venue |
Adding See Tickets data into your template
To begin, you will need to create editable content areas where you want See Tickets data to appear.
The general attribute for creating editable content areas is: mc:edit="section"
Mailchimp describes this process in detail here.
Using that general attribute and the field names above, you will be able to customize your content with See Tickets data.
Let's say you want to inject the client account display name at the top of the email.
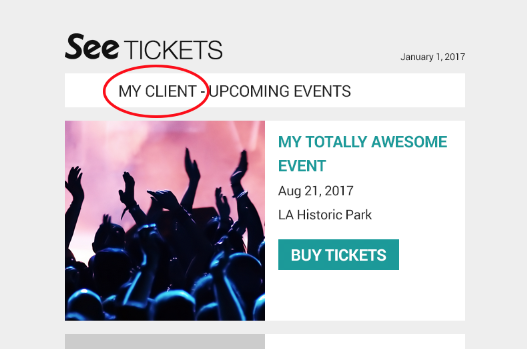
In order to have the client account name display (where 'MY CLIENT' is in the example above), you would change the plain text version...

...to a version that uses the Mailchimp attribute and the field from See Tickets that you want to display:

On your email, it would generate the following: MY CLIENT - UPCOMING EVENTS
Adding attribute based dynamic data into the event level marketing email
While mailchimp offers some customized tags to be added (per the above section). If you want to use a dynamic field in a tag attribute your out of luck with their system. In order to do things like images (which need the source attribute) or a buy button (which needs the href attribute) we offer a dynamic replacement system for dropping pre-filled html from the template back into the campaign as flat html. There are three sections supported at the event level marketing email. They are named: eventhtml, eventbuybutton, eventimage. Here is an example:<div id="eventbuybutton" style="display:none" ><a href="{EventURL}" target="_blank"><span style="color:#000000"><strong><span style="font-size:24px">{EventName}</span></strong></span></a> </div>
Lastly, add the following line of code where you want your repeated events to live:
<span mc:edit="eventbuybutton"></span>
Note, that MailChimp will replace any {}'s in the attributes with url encoded versions of that (eg. {EventURL} => %7BEventURL%7D after you save). Don't panic, we take this into account and will still replace the variables with our dynamic event info. In some cases, you may need to use %7B and %7D instead of the { and }.
Adding a repeated events section in the client level marketing email
This functionality is not inherently built into Mailchimp, however, our integration allows you to auto-generate marketing email body sections with upcoming events dynamically.
For example, this is an auto-generated marketing email that is set to display the upcoming events on the client account.
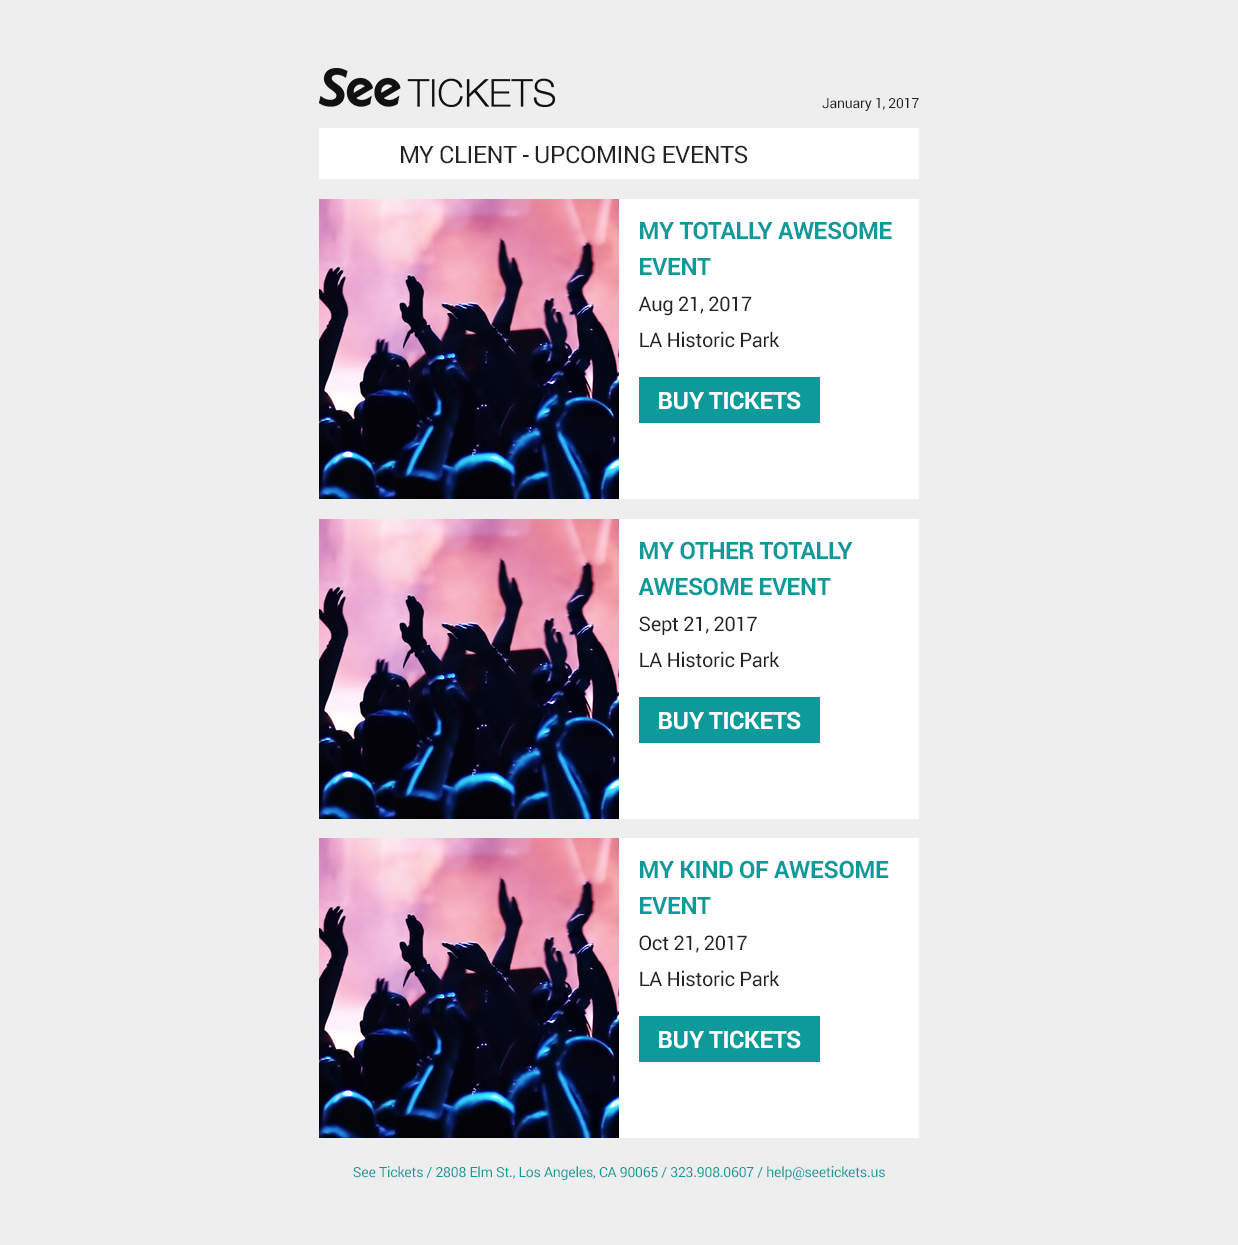
All of the data above came from the See Tickets system.
To add a repeating events section to your template, write html for a single event block and surround the entire section with the following code:
<div id="eventsection" style="display:none" >templated html code with {}'s </div>
Think of this as a template for each event the system will generate.
Lastly, add the following line of code where you want your repeated events to live:
<span mc:edit="allevents"></span>
Make sure this template is saved on Mailchimp in either a folder titled Client or Event (depending on if its a Client level or Event level email). This is mandatory and your setup won't work unless you have these folders.
Create your email
All emails you want to send with See Tickets data need to be created on See Tickets first. When duplicating a previously sent email, do so on See Tickets
Begin by selecting a template. These templates are imported from your Mailchimp account.
If you are sending an email with event information imported from See Tickets, make sure the proper tags are included in your email. See above if you have not done this yet.

Choose the list you want your email to go to.

Enter a subject for your email. It's best to keep your subject clear and concise. It is the first thing your customers will see in their inbox, so make sure the subject is relevant and eye-catching. Shorter subjects improve readability on mobile devices.

Enter a From name. This is the name that will appear in the customer's inbox when they receive the email.

Enter a Reply-To email address. if the customer replies to the email, their reply will go to this address.

Next, choose which events you want to feature in the email. Choose to send all public events, the upcoming 10 events or the upcoming 5 events.

Filter your list by adding a tag. These tags correspond to the tags added on the event edit page. For example, if you have added “Rock” to your Rock-genre events, all customers who have purchased tickets to your events with the tag “Rock” will appear in your list.

Test your email
Test your email by entering your email address in the Send Test To field.

If you would like to send a test email to multiple people, separate email addresses with a comma.

A test email will appear in your inbox. Test it to make sure all images are displaying properly, text is correct and links are working as expected.
Send your email
Once you are ready to send your email out to your recipients, you can choose to send the email immediately or schedule it for a later date and time.
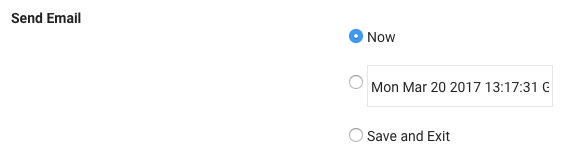
If you are done editing, but aren't quite ready to send your email, select Save and Exit to save your work and revisit it later.
All emails are saved on both the See Tickets platform as well as your Mailchimp account. Once you save your email on See Tickets, you can go back in and edit it on Mailchimp at any time! You can even send your emails from the Mailchimp platform. As long as the event information is generated on See Tickets, you can choose to finish and send your email from either platform.
Tips and Tricks
- If you want to duplicate a previously sent email, make sure to do so from the See Tickets platform. Duplicating from the Mailchimp platform will display the same events that were sent previously. Duplicating from the See Tickets platform will generate the most recent set of events.
- You can view previously sent emails, but you cannot edit or resend them. To resend an email, you must copy it using the copy icon on the Mailchimp Marketing dashboard.
- You can set a default "From Name" and "Reply-to Email" on your client profile edit page.